
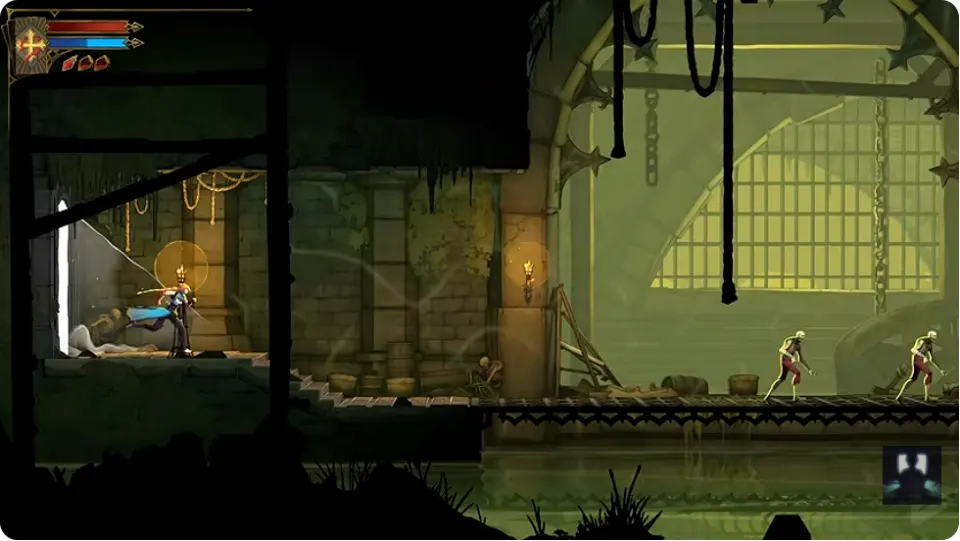
If you have not defeated The Fallen, follow the spirit’s barrel clue into the sewers and make that fight your next goal. If you already have the Arcane Whip, use it to continue upward; return for the Cestus, attack-up book, or statues only when you want their extra benefits. At the rooftop demo-end notice, decide whether to explore more before moving forward to the main menu.
This guide covers the Paris demo, through its rooftop stopping point. It gives exact actions for the barrel mechanism and selected returns, plus landmarks for the later journey. The stretch after the whip tutorial is a landmark sequence rather than a turn-by-turn walkthrough.
The whip opens the way forward—and makes old routes worth revisiting. After The Fallen, grapple targets become routes to both the next area and optional rewards. That is a reason to return for a benefit you want, not a requirement to clear every collectible before continuing.
Contents
- Main progression: streets, The Fallen, and the rooftop
- Choose a worthwhile return after getting the whip
- When progress feels stuck
Main progression: streets, The Fallen, and the rooftop
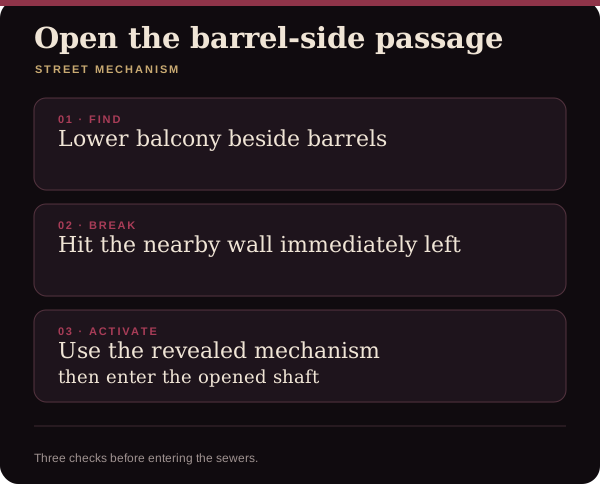
1. Open the way below the streets
When the spirit tells you the lever is near the barrels:
- Drop below the street balcony to the stacked barrels and candles.
- Attack the breakable wall immediately left of the barrels.
- Use the handle revealed inside the wall.
- Look for the hanging bucket over the shaft. The wooden panels open a downward passage; descend into the sewer section.
The opened shaft is your completion signal here. This mechanism does not open the large gate where you later meet The Fallen, so do not keep searching the barrel alcove for a second gate-opening action.
Continue through the sewer section toward the large double gate in the flooded stone chamber, with waterfalls beside it. That gate marks the approach to The Fallen.
2. Prepare for The Fallen
Before entering the fight, check your health. There is a hidden food pickup in the green stone-arched sewer room with stairs rising to the right and a pink anchor hanging beneath their edge.
Stay on the bottom floor below the stairs. Walk left to the floor’s end, attack the low cracked wall, and collect the roast bird behind it. Check your health afterward rather than assuming the pickup always fills the bar.
For the fight, concentrate on recognizing the end of an attack sequence before committing to damage. One demonstrated approach uses wall jumps to get over his advancing jumps, then a slide through the third slash of his three-hit sequence, followed by a brief counterattack. Sliding too early can still get you hit.
When he starts using the whip, leave room to respond to the aerial swings and landing attack. Do not rush underneath merely because you expect him to land: the demonstration includes delayed landings that catch that assumption.
You do not need to obtain the hidden Cestus first. Its route requires the ability gained after this fight. If you are losing here, work on the attack you are misreading and use the nearby food if still available; searching for that weapon cannot solve your current preparation problem.
Practise The Fallen’s three-hit claw response or set a nearer boss-door retry.
3. Use the new card ability to reach the high passage
After the victory, Rose finds a gem and the Fallen card changes. The large gate remains closed. Dialogue identifies two other guardians and their keys, so the closed gate does not mean you failed to collect the first boss’s reward.
Continue to the high passage where Rose says it is too high. The Arcane Whip tutorial introduces aiming at luminous anchors or enemies and hooking onto them to reach new areas. Follow the control prompt shown in your own game.
Before making a long return trip, try the new ability at this obstacle. Once you can attach and reach the high route, you have the tool needed for the optional returns below. If your aim does not connect, check that you are targeting an anchor or enemy rather than treating every visible platform as a grapple point.
4. Continue toward the rooftop stopping point
The later journey passes through green-waterfall rooms, then Court of Miracles, then Bridge of the Millers, and finally the rooftop city conversation.
Use these landmarks to recognize progress:
- Court of Miracles has a red-lit arch, hanging birds, and stairs around the lower passage.
- Bridge of the Millers has a large waterwheel beside the bridge arch and a green mechanism.
- Above the wheel, the route reaches the rooftop panorama and a conversation with The Fallen.
Use these as progress checkpoints, not directions for every intervening room. If you are stuck at the crank beside the pale doorway and descending stairs, the next exit is not covered here.
After the rooftop conversation, go left up the stairs toward the pale blue-white doorway. At the demo-end notice, stop before continuing if you want more exploration. Moving forward returns you to the main menu; the notice allows exploration before this boundary.
The conversation still refers to the other guardians and keys. It is the demo’s stopping point, not completion of the Catacombs objective. The notice also says demo save data can carry into the full game, but does not establish transfer between platforms or accounts.
Choose a worthwhile return after getting the whip
You can continue toward the rooftop without completing this collection list. Choose a detour for a benefit you want, rather than clearing every marker before moving on.
| What you want | Return to | What to consider |
|---|---|---|
| A different close-range weapon | Sewer Reservoir for the Cestus | Fast attacks with damage that increases as you keep attacking; expect an enemy encounter after the chest. |
| An attack increase | The book beneath the purple wheel | Requires the whip approach described below; the pickup displays ATK UP! |
| Nearby collectible progress | Sewer and Court of Miracles statues | Useful when already passing their rooms; do not assume each statue guarantees an immediate level-up. |
Get the Cestus in Sewer Reservoir
With the Arcane Whip unlocked:
- Return to Sewer Reservoir, immediately after the first Mirror of Life save point.
- Grapple up through the room to the grate platform in the middle of the huge background staircase.
- Lash directly upward to reveal a hidden anchor, then hook onto it and propel yourself up.
- Enter the upper secret room and interact with the large chest to obtain the Cestus.
- Prepare for the enemies that follow.
The hidden anchor is the important check if the obvious platforms seem to lead nowhere. More jumping from the grate is not a substitute for revealing it.
The Cestus gives you a reason to try sustained close-range attacks, but its short reach is a tradeoff. Treat it as an alternative combat style, not a guaranteed cure for every difficult encounter.
See the Cestus landmark and chest checks.
Reach the attack-up book
Look for the green-waterfall room with an enemy on the elevated right platform. Keep that enemy available for the demonstrated approach:
- Deal with threats below without killing the elevated target you need.
- Grapple toward that enemy to rise.
- Catch the upper pink grapple point.
- Find the lower alcove beneath the purple wheel and cluttered stone arch.
- Move to the alcove’s right end and touch the red-glowing book.
The pickup displays ATK UP! Follow the enemy-assisted approach above; keep the elevated enemy alive until you have used it to gain height.
If that enemy is already dead, leave this detour for now. This method uses it as a grapple target; an alternative approach is not covered here.
Find statues while revisiting familiar rooms
All six locations below use the Arcane Whip. They are selected returns, not an all-statues checklist.
| Recognizable location | Statue access |
|---|---|
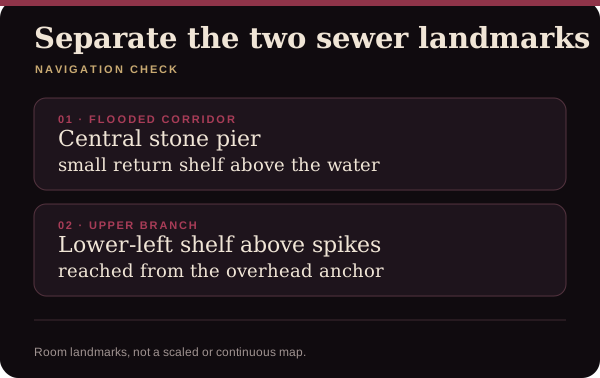
| Abandoned Sewers, far-right end of the flooded horizontal corridor | Grapple to the high platform, then swing back toward the small shelf on the central stone pier. |
| Short upper branch from the corridor’s right side | Drop from the upper passage, catch the lower anchor, and swing left onto the small shelf above spikes. |
| Waterfall room with a pale doorway at lower left | Swing left from the circular anchor above the right pier to the shelf directly above the doorway; watch the overhead spikes. |
| Tall room containing the attack-up book | Swing right, reverse left, then drop through the central platform and catch the lower anchor to reach the lower-left scaffold shelf. |
| Court of Miracles, high walkway above the red arch | Grapple toward the elevated enemy, deal with it, then go left along the walkway. |
| Next large red arch to the right, near the high right wall | Use the overhead circular anchor to reach the high right wall; break it to expose the statue niche. |
Break the statue when you reach it. Some pickups in the demonstration produce a level-up; do not plan around a guaranteed level from every statue.
Orient the two Abandoned Sewers rooms
Find Abandoned Sewers under Paris Streets on the Demo map. At the far-right end of the flooded corridor, match the high route, circular luminous anchor and small statue shelf on the central stone pier. The farther-right platform with a body on it is a different landmark. Grapple high, then swing back toward the statue shelf.
The short upper branch starts from the corridor’s right-hand portion. Inside it, match the upper horizontal passage, the pink anchor hanging below and the lower-left shelf; spikes lie below and to the right. Catch the lower anchor during the descent and swing left. These are local movements within the rooms, not a continuous crossing between them.
What should you check in the Arcana menu?
Boss rewards are more than extra damage: the Fallen card supplies the traversal power used above. If you are reviewing your available Arcana, also look for Works of Mercy. PlayStation’s July hands-on report describes them as card-specific tasks that unlock improvements called Blessings. Follow the tasks and rewards displayed in your own build; they are not established here as requirements for reaching the demo endpoint.
When progress feels stuck
First identify what is stopping you. A closed route, a missed interaction, and a mistimed fight need different responses.
If you cannot descend from the streets, return to the barrel-wall steps. If you cannot reach grapple ledges before The Fallen, finish the boss and unlock the whip. If the Catacombs gate stays shut afterward, do not mistake the future key objective for a failed reward pickup.
With the whip, check for a usable target before committing to a hazardous drop. In the spike-floor statue room, catching the lower anchor is part of the descent, not an optional flourish.
At the rooftop boundary, choose between finishing the demo session and collecting more. If exploration is your goal, make that choice before moving forward to the main menu; reopening a completed save is not covered here.
Check official Demo access and save-transfer conditions, or return to the game guides.